Docker Compose
We can run Screwdriver locally via Docker Compose. This handy feature will bring up an entire Screwdriver instance (UI, API, and log store) locally for you to play with.
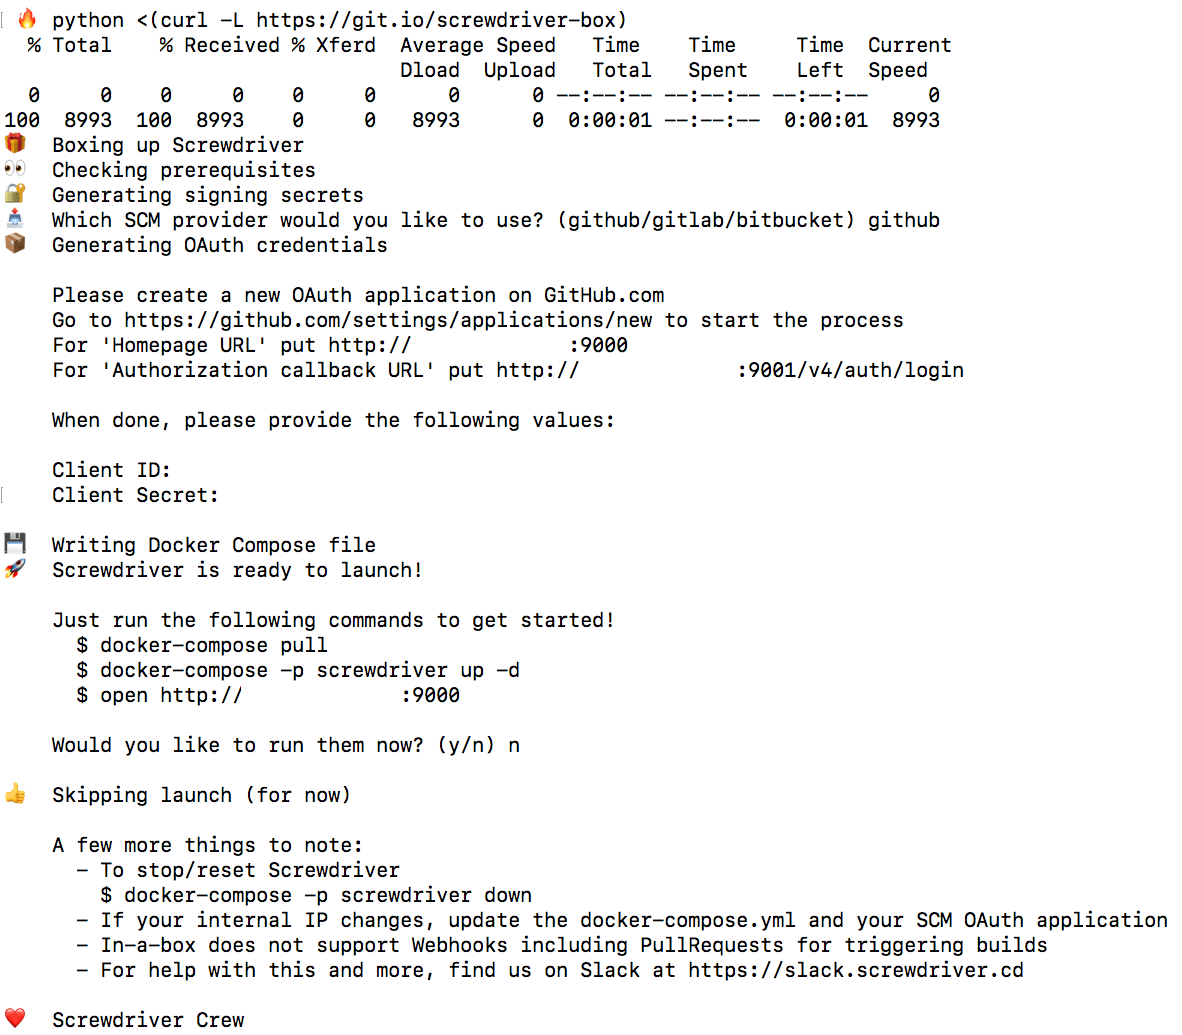
Follow instructions in the Docker Compose Quickstart.
Running Docker Compose in AWS EC2 (Production Deployment)
We can extend our local Screwdriver to support running it in production using Docker Compose, too.
Let’s assume we would like to deploy Screwdriver to a server with a SSL-enabled domain called
https://screwdriver.mycompany.com, what we will need to do is the following:
- Spin up an EC2 with size at least large
- SSH into the EC2 to Install Docker and set up Nginx and SSL
- Complete the Docker Compose Quickstart to get a working
docker-compose.ymlfile along with its local.yaml unchanged
Next, let’s configure the domain https://screwdriver.mycompany.com, which is discussed in the following section:
Configuring Screwdriver with a Custom Domain
Modify the docker-compose.yml:
- Replace all
http://${auto-generated-private-ip}:9000withhttps://screwdriver.mycompany.com, where${auto-generated-private-ip}is the private IP address of the EC2 instance - Replace all
http://${auto-generated-private-ip}:9001withhttps://screwdriver.mycompany.com:9101 - Replace all
http://${auto-generated-private-ip}:9001withhttps://screwdriver.mycompany.com:9102 -
Add a new config of
OAUTH_REDIRECT_URI: https://screwdriver.mycompany.com:9101to theenvironmentsection of theapiservice. For example:version: '2' services: api: ... environment: PORT: 80 URI: https://screwdriver.mycompany.com:9101 ECOSYSTEM_UI: https://screwdriver.mycompany.com ECOSYSTEM_STORE: https://screwdriver.mycompany.com:9102 OAUTH_REDIRECT_URI: https://screwdriver.mycompany.com:9101This is because Screwdriver, in this case, computes redirect URL as non-9101 port URL of
https://screwdriver.mycompany.com:9001, which will cause “Redirect URI mismatch” OAuth error during sign-in phase later -
In the
apiservice environment variable list as well, setAUTH_CHECK_BY_ID: "true",SECRET_SD_ADMINS, andSECRET_ALLOW_LISTas the following:AUTH_CHECK_BY_ID: "true" SECRET_SD_ADMINS: | [ "github:adminGitHubUserName:adminGitHubUserId" ] SECRET_ALLOW_LIST: | [ "github:adminGitHubUserName:adminGitHubUserId", "github:orgMember1GitHubUserName:orgMember1GitHubUserId", "github:orgMember2GitHubUserName:orgMember2GitHubUserId", ... ]where
*GitHubUserIdcan be obtained using GitHub API. These 3 configs makes sure that only the specified user can sign-in to see all dashboard pipelinesMore infor about these 3 configs can be found at Authentication/Authorization docs
Set up the SSL certificate on the server with the following Nginx reverse proxy configs:
- Port forwarding 443 to
localhost:9000 - Port forwarding 9101 to
localhost:9001 - Port forwarding 9102 to
localhost:9002
Note that our HTTPS ports are 443/9101/9202. We don’t have Nginx listen on 9001 or 9002 because Nginx cannot occupy 9001 and 9002 due to the two already been taken by Screwdriver
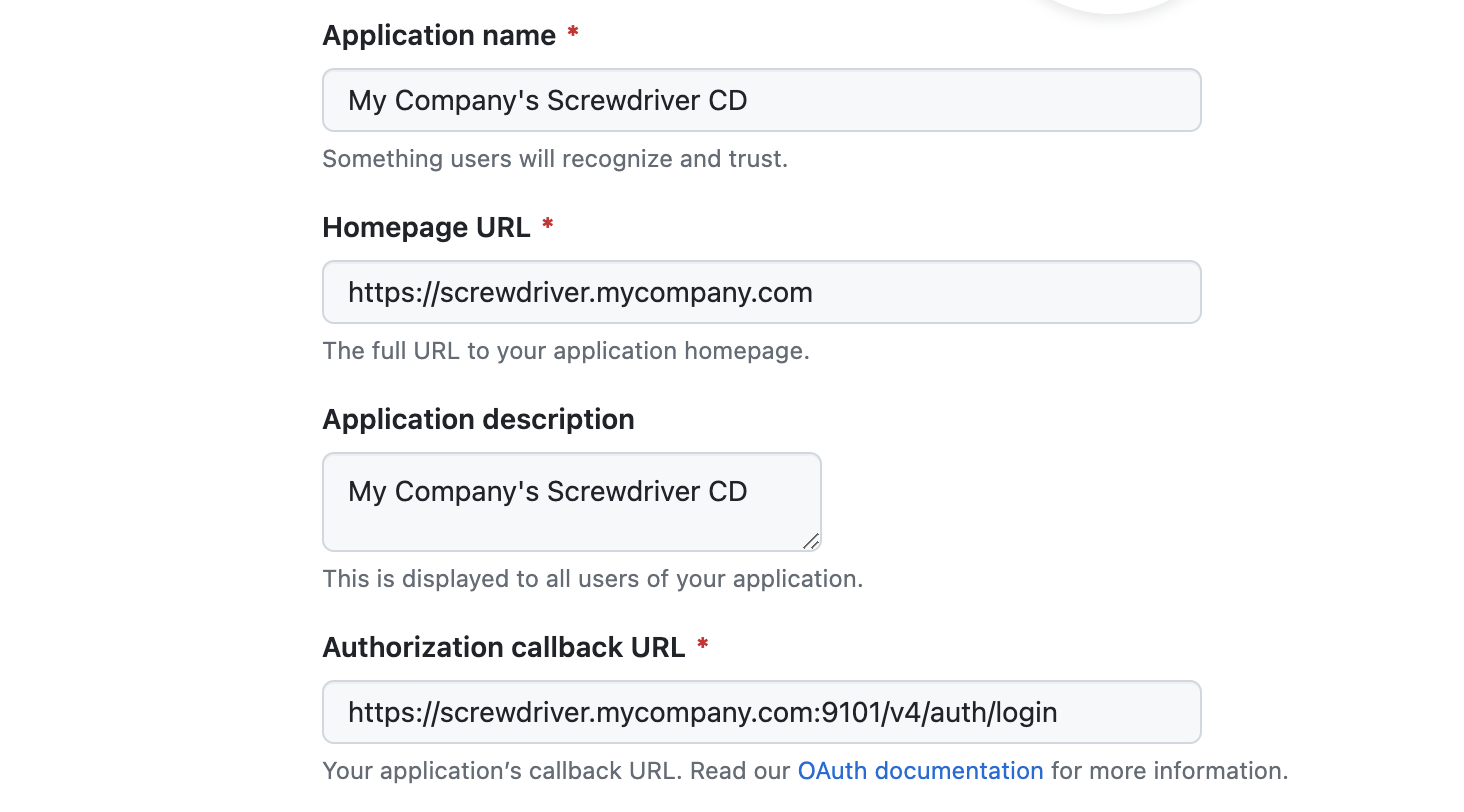
The GitHub OAuth app should have configuration that looks like
Configuring SCM User
version: '2'
services:
  api:
    image: jack20191124/screwdriver:latest
    environment:
      SCM_SETTINGS: |
        {
            "github": {
                "plugin": "github",
                "config": {
                  "username": "my-scm-user",
                  "email": "my-scm-user@my-company.com",
                  "secret": "<my-random-secrets-sderegw3rfe>",
                  "privateRepo": true,
                  "oauthClientId": "<generated-with-local-screwdriver>",
                  "oauthClientSecret": "<generated-with-local-screwdriver>"
                }
            }
        }
Make sure to add my-scm-user@my-company.com to GitHub account/organization’s member list for it to obtain proper
permissions
Spin Up Screwdriver
Start Screwdriver with:
nohup docker compose -p screwdriver up &
Managing Screwdriver Instance
Periodically Deleting Dangling Docker objects using cron
The Docker Compose doesn’t handle the cleanup finished executor containers. If a Screwdriver pipeline run finishes and its executor container is left there, EC2 will quickly run out of disk space. To deal with this potential problem, we can have a script like:
#!/bin/bash

while true; do
  docker container prune -f
  docker volume prune -f
  sleep 30
done
This script can run by nohup ./cleanup.sh &. Note that this script example cleans up all dangling containers every
30 seconds
Configuring SD-in-a-Box Manually
Note: This section does not need to be followed if the two sections above are done.
SD-in-a-box was intended to be an easy way to run a Screwdriver cluster locally on your development machine so you can demo its features first-hand.
Custom Docker Images
Since it’s powered by Docker, you can determine which images to use for it. SD-in-a-Box (and Screwdriver as a whole) uses the following Docker images:
- screwdrivercd/screwdriver - API. The main engine of the CI/CD cluster.
- screwdrivercd/ui - UI. To pleasantly interact with Screwdriver.
- screwdrivercd/store - Artifact repository. Responsible for artifacts like build logs & templates
- screwdrivercd/launcher - Worker component that executes the build. You cannot change the image. You can only specify a specific tag to use.
Here is a snippet of the docker-compose.yml file
version: '2'
services:
  api:
    image: screwdrivercd/screwdriver:stable
    . . .
  ui:
    image: screwdrivercd/ui:stable
    . . .
  store:
    image: screwdrivercd/store:stable
    . . .
You can make a local Docker image to use instead of one of these.
To start up the SD-in-a-Box, execute the following command
$ docker-compose -p screwdriver up
Volume-Mounted Source Code
You can choose to replace a component with a local copy. This is incredibly helpful if you’re trying to implement an update to a service and want to see how it impacts the entire cluster.
Modify the docker-compose.yaml, targeting the component you would like to replace. In the following snippet, we replace the API with a local source.
services:
  api:
    # this "build" stanza replaces the default "image" setting
    build:
      context: ./relative/path/to/api_source
      dockerfile: Dockerfile.local
  ui:
    . . .
  store:
    . . .
To set your update, you’ll need to rebuild the docker-compose services first.
$ docker-compose build --no-cache
Restart the local cluster to have your changes take effect.
$ docker-compose -p screwdriver down
$ docker-compose -p screwdriver up
Caveats
This approach does very well with replacing complete services, and also carries some limitations:
- Unable to replace individual modules with this methodology.
Local Development Instances
If you plan on making adjustments to a specific Screwdriver component, you can choose to replace a component with your development instance. This will give you a good idea on how it affects the other Screwdriver components before submitting it via Pull Request.
General configuration
One important thing to note is that your docker-compose.yml will have all the components configured by I.P. address (as opposed to localhost). The following features will cease to work if you choose to use localhost instead of an I.P. address:
- Builds will not start locally
Configuring the UI
You can choose to use a local development instance of the UI.
In development mode, the UI hosts itself on port 4200 and assumes the API is served locally on 8080 by default. You would need to modify the UI’s config/environment.js file to point to your local Screwdriver cluster, specifically the API. This can be done by modifying SDAPI_HOSTNAME and SDSTORE_HOSTNAME values to match the services -> api -> environment -> URI and ECOSYSTEM_STORE in your docker-compose.yml.
The following is a snippet that highlights the change you would make in the config/environment.js
 ...
 APP: {
       // Here you can pass flags/options to your application instance
       // when it is created
       SDAPI_HOSTNAME: 'http://172.142.26.99:9001',
       SDAPI_NAMESPACE: 'v4',
       SDSTORE_HOSTNAME: 'http://172.142.26.99:9002',
       ...
     },
The following snippet highlights the docker-compose.yml values that need to be modified to use your local UI instance along with the SD-in-a-box cluster. You will also need to delete the ui section under services.
version: '2'
services:
    api:
        image: screwdrivercd/screwdriver:stable
        ports:
            - 9001:80
        volumes:
            - /var/run/docker.sock:/var/run/docker.sock:rw
            - ./data/:/tmp/sd-data/:rw
        environment:
            PORT: 80
            URI: http://172.142.26.99:9001 # API
            ECOSYSTEM_UI: http://localhost:4200 # need to change to this value here
            ECOSYSTEM_STORE: http://172.142.26.99:9002 # Store
    . . .
    store:
        image: screwdrivercd/store:stable
        ports:
            - 9002:80
        environment:
            ECOSYSTEM_UI: http://localhost:4200
            URI: http://172.142.26.99:9002
Please note that you cannot use localhost for the ECOSYSTEM_UI value if the URI value is set to an I.P. address. You will receive an invalid token after log-in.
Once you’ve made these changes, follow instructions in the UI README.md to get it running on http://localhost:4200.
Rerun the commands to restart SD-in-a-box with the new changes:
$ docker-compose -p screwdriver up
$ docker-compose build --no-cache
$ docker-compose -p screwdriver up
Note: Using Chrome will cause login issues. Please use a different browser.
Configuring the API
You can choose to use a local development instance of the API.
Further customization can be done by setting the related environment variables. Learn more in the API documentation
Configuring the Store
You can choose to use a localhost development instance of the Store.
In development mode, the Store hosts itself on port 80 by default. You may change this value to whichever port you desire. For the purposes of this guide, we will assume it’s hosted on 8888.
The following snippet highlights the docker-compose.yml values that need to be modified to use your local store instance along with the SD-in-a-box cluster.
version: '2'
services:
  store:
    . . .
    ports:
      - 8888:80    # Port 8888 is arbitrary. You can choose another if you prefer
    environment:
      URI: http://11.22.33.44:9001
      ECOSYSTEM_STORE: http://10.73.202.183:8888    # Tells the API where the store is hosted
    . . .